Friday, May 28, 2010

During: Drywall Installed

The project is about at the half-way mark.  Drywall now covers the recently framed, wired and plumbed walls of the kitchen, sunroom and powder room, making the spaces really feel like rooms.  Below are a few photos showing the fresh drywall.

First is a photo looking toward where the L-shaped island will be.  The sink will be in the corner at an angle.  As a point of reference, this is roughly what one used to see from this same vantage prior to the renovation (wow, right?!).   I love how the new sunroom windows and doors look, and how bright, open and airy this new kitchen will be.


The next photo shows the corner where the new range and hood will be.

The final photo is taken from in front of the French doors in the above photo (just inside the sunroom from the study/music room).  The L-shaped island, which will have breakfast barstool seating on both of its sunroom elevations, is in the foreground.  The double oven and warming drawer will be on the kitchen wall seen on the left side of the background.

Wednesday, May 26, 2010

Selections: Carport and Breezeway Lighting

Enhanced exterior lighting will help make the house more attractive, functional and safe at night.  In addition to motion-sensor flood lights and landscape lights, Jane selected some decorative fixtures.   All outdoor lighting will be either automated to come when it's dark outside or motion sensor-activated.

First, the breezeway connecting the sunroom to the carport will receive two hanging chandeliers, one centered in each arch.


The carport will receive two coordinating  flush mount lights.

Thursday, May 20, 2010

Selections: Powder Room Chandelier

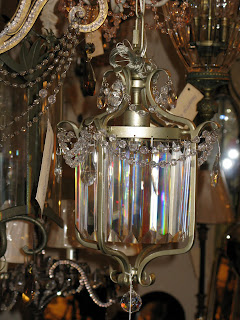
The original plan for lighting in the new powder room was to have sconces on either side of the mirror above the sink, along with recessed lighting above.  Apparently the room is not wide enough for sconces, however, so Jane decided to add a small chandelier in the space.  She ultimately picked a chandelier that references the other original lighting throughout the house.  It is a bronze and crystal piece: 


To me, this fixture directly calls to mind the chandelier in the first floor master bedroom.  I think it will be a great accent piece to the powder room.

Wednesday, May 19, 2010

Surprise: You're Replacing The Living Room Floor!

As with any renovation, there have been surprises:  some pleasant, some, not so much.  In the category of not very great surprises, Jane and Van recently learned that they're going to be replacing all of the wood flooring in the living room.

As background, when the house was first built, the living room was two separate rooms.  A recently uncovered old photograph shows that a fireplace was part of the wall separating the two spaces.  Sometime in the late 1940's or 1950s, the fireplace was removed and the rooms combined into one.  Apparently the floor was patched at that time, though not very well...

In removing all of the wall to wall carpet, the contractors noticed the seems and patchwork of flooring where the wall once stood.  The flooring contractor determined that patching the floor would not work in this instance, and recommended replacing all of the hardwoods in the living room.  

Tuesday, May 18, 2010

During: Staircase

The transformation of the staircase is underway:  it is bare of carpet and wallpaper, ready for new paint and refinished treads.

Before and During: Upstairs

The second floor of the house contains three bedrooms and one full bath. 
The renovation plan for the upstairs is to refresh the space and to add a new heating/air zone for the upstairs (the current central heat and air is insufficient and necessitated use of two window units, which will be removed). All of the floors will be refinished to match the floors downstairs. All of the walls and built in closets will be painted, so existing wallpaper (which is found in the hallway, the bathroom, and one of the bedrooms) will be stripped and repairs to the plaster will be made where needed. All of the light fixtures (which are crystal and brass) will be removed, cleaned, re-wired, and re-hung.

The layout of the upstairs will remain the same. In the future, an en suite bathroom may be added above the sunroom to serve the bedroom on the right in the above diagram. A small laundry room is also planned.

I did not take any photographs of the upstairs prior to the furniture being removed and commencment of work.  Below are a few photos of the rooms with work underway:

Top of Stairs:  The silk wallpaper (which matched what was in the foyer downstairs) has been removed.  Also, the new thermostat for the new upstairs central heat and air zone that has been added.


Bedroom One:  The cornice and window coverings have not yet been tossed, but wall preparation is well  underway. 


Bedroom One Closets:  The closets and dressing areas serving this and Bedroom Two are surprisingly functional given that they were built over fifty years ago.  The built-in shoe racks, drawers and hanging rods afford the same amenities that a modern closet organization system would afford.


Bedroom Two:  The wallpaper and carpet have not  yet been removed.


Bedroom Two Dressing Area:  The window air conditioning unit will  be removed now that the upstairs' heating and cooling systems have been upgraded.  Note the shoe storage on either side of the desk!  In the future, this area will likely lead to an en suite bathroom and new walk in closet.


Bathroom:  The Bathroom's original fixtures and tiles are still in great shape.  A new medicine cabinet, sconces and a bathroom exhaust fan will be added in the renovation. 


Child's Bedroom - This tiny and cute room has historically been where grandchildren stay when visiting. 


During: Juliette Balcony

As mentioned previously, the attic above the carport is being upgraded with a new rear dormer containing a new entrance to the attic space, a new heat and air conditioning system, and a new Juliette balcony where the former entrance was located.  The new space will be more accessible, more comfortable and larger.

The narrow staircase leading to the former entrance to the attic space has been removed and a decorative railing has been installed to create a charming Juliette balcony overlooking the garden.  I think it looks great. 

Monday, May 17, 2010

During: Millwork Detail

Below are a few up-close photographs of the beautiful millwork in the living room.  The photographs show preparations underway for the room to be painted. 


Friday, May 14, 2010

MS Paint: Carport Alterations

In the rear of the house built into a hill is a two car carport.  The carport was added in about 1980 in conjunction with the general remodel of the house occurring at that time.  Attached to the house, the carport allows for access to one's car without having to get wet when it's raining.  But it was also designed to function as an outdoor entertaining space, with a built-in kitchenette, an overhead fan, lighting, connectivity with the sunroom and the den, and a general aesthetic tying with the rest of the house.

Above the carport was an unconditioned attic with a window on one end and a small french door on the opposite end.  The attic space has been used for storage and as a recreation room for grandchildren, with a ping pong table and other games inside.  Access is a bit difficult because the French door and the staircase leading to the attic are both very narrow. 

Rough Rendering of Existing Carport Attic:


Jane and Van decided to alter the carport's attic to make it more functional and accessible.  To this end, they decided to add heat and air, to remove the existing staircase and make the existing entrance into a decorative Juliette balcony, and to add a dormer and a new access point in the back.  For now, they envision using the attic space for storage, although they could see it used as a home office or a bonus room or a guest suite at some point in the future.

Below are the plans for the attic, which were conceived with MS Paint and generally adopted/followed by their contractor in altering the carport attic.

The railing for the Juliette balcony was the subject of some debate.  Initially, their contractor proposed a decorative iron railing.  I felt that an iron railing would not be in keeping with the house's architecture (which features no iron work but extensive wood railing details), and instead proposed a custom wood railing with a decorative Chippendale accent.  Jane and Van agreed, and this is the rough plan they adopted for the Juliette balcony.

Thursday, May 13, 2010

During: Sunroom Windows and Doors Installed

The new sunroom windows and doors have been installed. They are made with low-e glass, which will prevent interior finishes from fading and which will make the room more efficient.


Selections: Appliances

For the kitchen appliances, Jane chose:

1.  A 36 inch Sub-Zero refrigerator with a freezer drawer on the bottom

2.  A Wolf six burner rangetop
3.  A Wolf double oven (one of the ovens is a convection/microwave oven)

4.  A Wolf warming drawer
5.  and an Asko dishwasher

All of the appliances will be in stainless steel.

During: Kitchen Island Being Framed

Below is a photograph of the beginnings of the new L-shaped kitchen island.


Selections: Sunroom Windows and Doors

Prior to the renovation, the sunroom's exterior walls were comprised of floor to ceiling sliding glass doors.  Although they provided great views outside, the sliding doors presented security and access issues because they could not be locked from the outside and because they could easily be jammed open by an intruder.   Over time, the glass in these doors had gotten cloudy, so a change was necessary.  Here is a photo of the sliding doors in the sunroom just prior to the start of the renovation:

In the renovation, all of the sliding doors will be removed.  In their place, casement windows will be installed along most of the exterior.  Two sets of French doors will be installed at each end of the sunroom (one pair next to the den, and one pair next to the study) for access to the garden.

Here is a photo of the doors selected (being delivered):
and here is a photo of the windows selected (being delivered):

During: Wall Preparations

The following photographs show prepations underway to paint the interior of the house.

Dining Room - As  you may recall, this room once featured beautiful silk wallpaper.  The crystal chandelier  has been removed for cleaning and re-wiring. 

Living Room (view from Foyer) -  Without furniture and draperies, the living room's extensive molding really is apparent. 

Staircase - The foyer, front hall, stairs, and upstairs hall all featured silk wallpaper.  All of the wallpaper has been removed.

During: It Takes a Village

A slew of people are at Jane's home on any given day making the transformation....


Wednesday, May 12, 2010

Selection: Backsplash

The corner in which the range will be located is the only area in the new kitchen that will have a backsplash (the rest of the counter space will be on the L-shaped island, so no other counter tops are against walls).  The range and hood certainly comprise a focal point in the kitchen, so the backsplash is an important component of the area.  With the overall kitchen aesthetic being simple elegance, an overly ornate backsplash design would not work in the space.

Jane met with her designer and the tile consultant to flesh out what she desired in a backsplash.  Together they determined that a polished marble in a color picking up on the color of the Travertine floor of the adjacent sunroom, the wood floor of the kitchen and the granite counter tops would be the main element.  A few accents in a coordinating ceramic tile would finish the look.

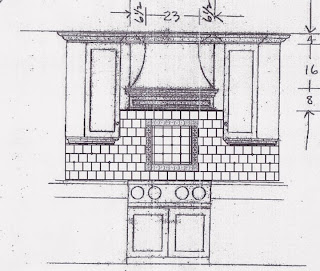
The tile consultant thereafter got to work in coming up with a few design schemes to consider, which follow:

After considering the alternatives and meeting again, a new and final plan was conceived:
The accent in the center is comprised of four of the following tiles, and the four other accents tiles are smaller versions of the same:

 I think it will be a stunning look.